The Illusion of Scale
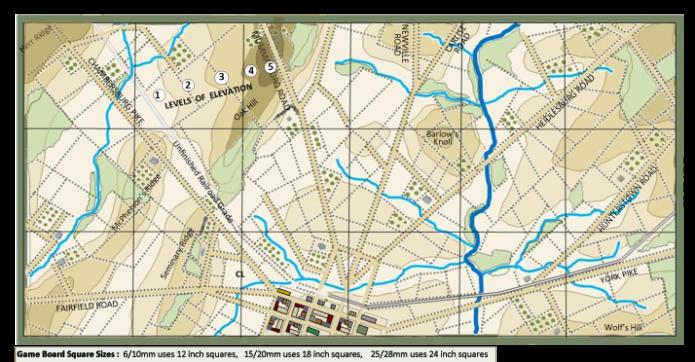
For all the scenarios in this book, the size of the grid squares on the scenario maps are defined by the figure scale that is being used as follows:
- For 6mm or 10mm figures each map square is 12 inches across and each game board inch is about 100 to 120 yards.
- For 15mm or 20mm figures each map square is 18 inches across and each game board inch is about 80 to 100 yards.
- For 25mm or 28mm figures each map square is 24 inches across and each game board inch is about 60 to 80 yards.
All miniature wargames are an abstraction to some degree and many things are out-of-scale. There is a constant debate of how close to the ground scale should the vertical scale be and should the buildings be in scale with the ground scale or in scale with the figures. No matter how rigorous is the terrain replication, the game board will inevitably be a compromise, but it should be a compromise that creates the illusion that all elements are in scale with each other – even if they are not. Our miniature wargame tables are, at best, an illusion of a historical battle and that illusion will not suffer with more or less abstractions provided the level of abstraction is consistent within each specific scenario or battle.
Modeling the Terrain
Scale and Elevation
Most of the game boards for the Eastern Theater battles have from one to six relative elevations with each elevation change representing approximately 20 to 30 feet of elevation difference. For example, the First Day of Gettysburg scenario boards have five elevation “Levels”, starting with “Level 1” and going up to a “Level 5” as indicated below. On that specific board, the top of Barlow’s Knoll (Level 3) is roughly two elevation levels lower than where the Mummasburg Road crosses Oak Hill (level 5) and historically there was about a 60 foot elevation difference between the two points. Some individual aspects of a battlefield’s terrain will often be unique and will require special rules. That, however, should not be considered a problem as “quirky terrain” – such as the “Devil’s Den” at Gettysburg — often imparts a unique tactical aspect when recreating a specific historical battlespace.
When modeling the terrain,
The rolling hills north of Gettysburg were typical of many of the eastern battlefields in Virginia, Maryland, Pennsylvania and the Carolinas
it is not necessary to portray each indicated level on the gaming board exactly as they are presented on the scenario map. Consider the scenario maps as guidelines that show which slopes were somewhat steeper than others and which hills were generally higher than others. Depending on the degree of replication or abstraction that is desired just about any terrain modeling technique will work as long as the overall impression of the battlefield is presented in a generally consistent manner.
Elevation and Going up Slope
With the exception of some of some steep river banks or abrupt slopes, most of the hills in these eastern scenarios were gentle rolling slopes that troops could easily go up or down without too much extra effort. However, there were always some significant exceptions. For instance, northwest of Gettysburg the east slope of Oak Hill was much steeper than the west slope. Consequently, there is no extra movement penalty for troops going up or down a slope unless the unit is moving up a “steep” slope which is defined as going up a three elevation differences in one action as follows.
If a unit is moving up two different elevation levels or their equivalent during any one movement action, then the movement rate is done at one terrain type worse than it normally would be. For example, should a unit be moving through “Light Woods” and going up a slope of two elevation differences, that movement would be done at the “Heavy Woods” movement rate.
Elevation and Line of Sight
There are two major scenery modeling techniques that wargamers use when portraying elevation differences and for determining the impact of intervening hills, knolls, or other sight blocking objects such as farms or woods. One is the “contoured terrain” method, where each of the major game elevation contours is portrayed as a distinct level so that there is no debate as to which elevation a unit is on, and who might be able to fire over whom. The other approach, known as “flex terrain” is where the gaming surface is portrayed with a thin flexible rug or the equivalent so as to create model terrain with gently rolling hills and valleys that seamlessly blend together. Nevertheless, given the fact that even the smaller 6mm or 10mm figures are greatly out of scale with most wargame ground scales, significant abstraction is usually necessary in simulating the Line-of-Sight (LOS) impact of the miniature terrain no matter which modeling method is used.
Contoured terrain can either be made with layers of stryofoam cut roughly to the shape as the actual terrain contours so as to make a permanent miniature board of the historical terrain or it can take the shape of removable individual hills that approximate the shape of the desired hills — which then can be used for other scenarios.
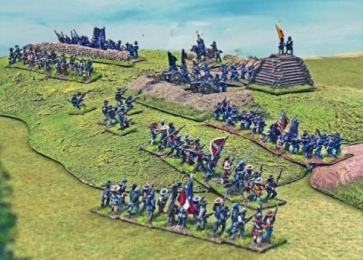
The contour terrain method makes it very easy to determine which units are on a slope and which are not. Depending on the scenario, the sloping hill that the two Confederate brigades are attacking could be plausibly defined as either a Level Two or Level Three Hill. – Terrain & Photo: Malcolm Johnston
If contoured terrain is used, then the First Day of Gettysburg terrain map, with its five indicated levels can serve as a general guide for the respective heights and slopes of the different levels. With that in mind, the diagram and table below should be taken as a relative guide to the terrain and how elevation differences impact a unit’s LOS rather than as a strict elevation definition of each level being so many feet high. In scaling these “levels” to the wargame table, assume that one “level” of terrain corresponds to roughly the height of most farm buildings and orchards, while light woods are twice that and heavy woods are triple that – and this will look even better if the buildings used are one scale less than the figures – so, if you wargame with 25mm or 28mm figures consider using 15mm buildings, as they will look just as good and their “footprint” will be closer in scale to the ground scale.
The sharp edges of contour terrain pieces can be disguised by spreading flocking along the edges that is used on the terrain pieces themselves. — Terrain & Photo: P. J. O’Neal
Since the vertical scale is almost always exaggerated on a typical wargame table, a case can be made for using the lower ½ inch per each level even for the larger 15mm sized figures – it all depends on personal preference and the terrain effect you are trying to capture.
The below hill guidelines assume that each 6mm/10mm “level” is approximately ½ inch, each 15mm/20mm level is about 3/4 inch and each 25mm/28mm level is about 1 inch. However, given the wide variety in the height of even “standardized” figure heights, it is quite possible that for any given wargame table, a different elevation value per level might look better. For example, for 15mm figures use either ½ per level or ¾ inch per level, whichever looks better to you.

ADF – ET Elevation Levels
 So, a unit on the top of Herr Ridge (Level 4) could see, to some degree, over farms, orchards and light woods, but heavy woods would hide anything behind them. However, even if a unit is higher than a potential “blocking object” and could technically see over it, the area directly behind such an “object” would still have a “shadow” area or “dead ground” that would not be visible. And even a small stretch of “dead ground” can have a significant tactical effect, as in the Battle of Piedmont scenario. As might be expected, taller objects would have a larger “shadow” than a shorter objects and a high hill has a longer shadow than a low hill. A rough guide to this shadow effect for contoured terrain is suggested on the table below.

Line-of-Sight Shadow Effect
For example, in the previous diagram should a 15mm battery on Seminary Ridge (Level 3) want to fire at a target just beyond the orchard, it could only do so if the target was more than two inches beyond the edge of the orchard, because if it was closer than two inches from the orchard’s edge, the LOS “shadow” of the orchard would prevent the battery from seeing it.
If flex-terrain is used, a pliable gaming surface such as a thin rug with all the major terrain areas painted or flocked onto it, can be draped over various shapes of approximately the correct heights to create the impression of gentle rolling hills that seamlessly flow into each other. Flex terrain has the visual advantage that the resulting terrain has more natural undulations which are typical of the Virginia, Pennsylvania and Maryland countryside — which saw the vast majority of the eastern fighting.
Flex terrain mimics the subtle slopes of many a civil war battlefield – Terrain: Dean West Photo: Patrick Lebeau
Flex-terrain can have the disadvantage that it can be more difficult to determine which relative level a unit might be on or to easily discern if a certain battery can fire over a specific battle line. However, as illustrated below, a “same sized” dice or “standardized” block — perhaps equal to the equivalent of one level — can be used to indicate a standard “target height” or “object height”. Then a long ruler or straight edge is laid from the top of the “shooter’s block”, across the intervening object or hill and to the intended “target block” to determine the “shadow area”. If the ruler or straight edge can touch the top of the shooter’s block and the target’s block then the shooter has a legal LOS. In the example below, the small knoll blocks visibility to target “A”, but not to target “B” so, a “hilltop battery” could see and fire on target “B”. To determine LOS over other blocking terrain such as a farm complex or light woods, small standardized blocks could be fashioned to indicate the relative true game height of each of these objects and used in the same manner to determine which blocking terrain can be seen over and which cannot. 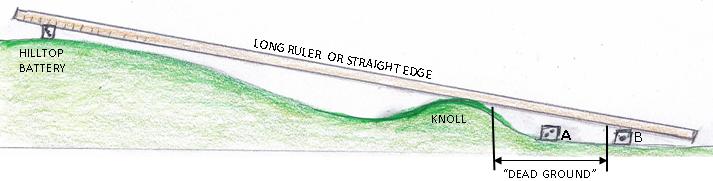
 Elevation and Visibility Distance: On a 19th century battlefield obscured with the dust of thousands of men, animals and dense layers of black powder smoke, holding the high ground could give units a distinct visibility advantage. Technological advances in the effective range of rifled artillery could be largely negated if targets could not be seen and identified. But, even a modest height advantage could enable experienced commanders and gunners to see over the smoky chaos and engage targets at much longer ranges than was practical in earlier wars. The visibility advantage of Cemetery Hill was probably one of the main reason the Union would eventually put 12 batteries hub-to- hub along its crest and while Big Round Top was certainly the highest point on the battlefield, it had questionable military value since it was covered with heavy woods which tended to nullify much of its potential visibility advantage. The following table shows the visibility advantage of the high ground and how far a unit can see from each of the different elevation levels.
For all the scenarios listed here unless specified otherwise, morning is up to and including the 12:00 noon turn and afternoon is from 12:30 PM up to and including the 7:00 PM Turn. All turns from the 7:30 PM turn on are considered as night turns.
If a unit wishes to fire at an enemy unit that is beyond visibility, it can still do so – but, it would be considered to be “area fire” and would cost the shooter one less die. It is certainly possible that an artillery battery on higher ground (level 3, 4 or 5) than an opposing artillery battery on lower ground (Level 1 or 2) would have full visibility while the battery on the lower elevation would be forced to fire back with “area fire” and consequently would be rolling one less die than its opposing battery on the higher ground. In such a case, the guns on the high ground would definitely have an advantage. The height or visbility advantage would certainly have been one possible factor on the afternoon of July 2 at Gettysburg, when combined Confederate gun battalions on Benner’s Hill attempted to engage the Union batteries on Cemetery Hill – a somewhat higher position. After about two hours, it became clear that the Federal gunners were winning and the Confederates began to withdraw their guns off Benner’s Hill.
Terrain Details
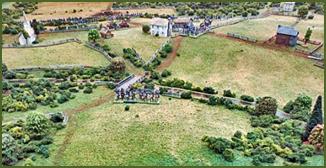
Given the large ground scale of Across a Deadly Field, a better battlefield impression is usually created if the buildings are at least one size smaller than the figure size. If using 15mm figures where one inch is about 80 to 100 yards, 10mm or even 6mm buildings often have a “footprint” that is closer to consistency with the game’s ground scale than would most 15mm buildings. Also, Across a Deadly Field does not recommend trying to model every building in a farm complex; but, rather suggests that the “farm area” be defined by a fenced in area with a single “farm like” building. This will define where a “farm area” is and where it is not — while still leaving plenty of room for the figures. Our miniature wargame tables are, at best, an illusion of a historical battle and that illusion will not suffer with more or less abstractions provided the level of abstraction is consistent within each specific scenario or battle.
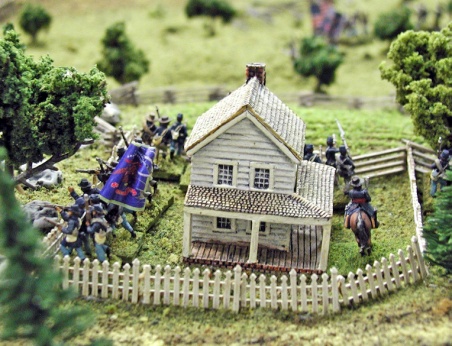
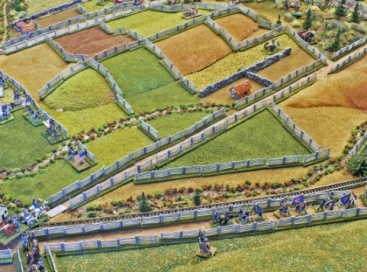
Here a Union brigade of four regiments defends a fenced farm area. — Terrain and Photo by Doug Kline
If a unit is in a built-up farm area – an enclosed fenced area with a building in it – the target unit gets a -1 DRM from artillery fire and a -3 DRM from infantry fire – but no “additional” benefit from the surrounding fences. Units in a farm area do receive the -1 MMP cover morale benefit for being in cover against all fires. LOS extends into a farm or orchard area, but not through it.
When firing out from within a farm or town area a unit’s FPs are halved unless the unit is exactly on the edge – as in this picture – against a unit outside the farm area.
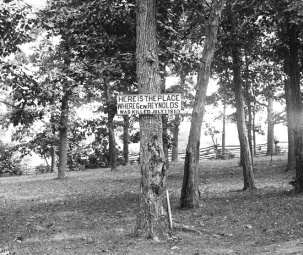
A typical Gettysburg light woods where General Reynolds was killed. Photo: US Library of Congress
Light and Heavy Woods: Eastern woods could either be light woods or heavy woods with the difference usually being determined by the proximity of the woods to active farm areas. When the wooded areas were adjacent or near the farms, the domestic animals were often left to wander through them to seek shade from the summer sun and to graze on the grasses and brush under the trees. The net result was that over a few seasons, the understory of the forest would be cleaned out while the farmers themselves would chop down the smaller trees for fence rails and fire wood. And with the understory thinned or cleared out, movement was easier and visibility was better. The heavier woods were usually in areas that were too wild, rugged or steep for the animals to graze and consequently the understory often became a tangle of small trees and tough vines.

The tangled heavy woods on Culps’ Hill at Gettysburg. The dark spots on the trees are where they were struck by musket balls fired by the upslope Union troops.
Photo: US Library of Congress
Visibility determination is different for heavy and light woods. Units on the outside of heavy woods can only see a target if it is on the edge of the heavy woods. However, units on the outside of light woods can see into one inch of light woods. If two opposing units are in heavy woods they can only see up to one inch through the woods. However, they could still do area fire in heavy woods out to a maximum distance of two inches. If two opposing units are in light woods, roll a 1D6 for visibility before each fire and that is the visibility in inches – up to a maximum of three inches – or up to a maximum of four inches for area fire in light woods. If two opposing units are in heavy woods, the procedure is the same except the all distances are defined as “half inches” with a maximum visibility for heavy woods being one inch or two inches for area fire. For both heavy and light woods of any size, there is no visibility completely through the woods to an opposing unit on the opposite side of the woods.
The Eastern Roads
In the rural east, such as around Gettysburg and Antietam, there were two road types — the main macadam or gravel roads and the many smaller farm roads that were usually dirt. And the more rural was the area, the more the dirt roads were the norm. The main roads were usually bordered by heavy rail and post fences and were named, though the names could vary depending on location. For game purposes the main – or “named roads” – should be treated as “roads” for movement and the “farm roads” should use the “trail” movement category.
A Multitude of Fences
Many areas of eastern agricultural areas had wooden fences of every possible type and based on best historical estimates the scenario maps indicate their most likely locations. Some agricultural areas such as those in Pennsylvania seemed to have fence everywhere; other areas, such as some of the more rural Virginia areas had much less. In any case, it is not necessary to model each and every fence. As noted, the heavier wood fences were usually found along the “named” Roads and Pikes — such as the Chambersburg Pike — and should you have a limited model fence inventory, those should be simulated first. The lighter split rail fences were commonly used around the individual fields and farms, and an acceptable representation of the fenced fields of Gettysburg could be accomplished by simply modeling every other fence. In any case, the “fence rules” are as follows:

Across a Deadly Field – ET Heavy Fence Photo: US Library of Congress
Crossing Fences
Any movement across one or more fences or stone walls is done at the broken terrain movement rate. If limbered artillery or an infantry column crosses any fence or stone wall, a “gap” in the fence is immediately created at that point. If a unit in line or extended line – not skirmishers — crosses a light wood fence it is assumed they have knocked it down as they crossed. A heavy wood fence or a stone wall, however, has to be climbed over at the broken terrain rate and it is assumed to remain, unless a gap was created by a column of infantry, cavalry or limbered artillery as noted above.
Orchards
The Maryland, Virginia and Pennsylvania farmers loved their orchards and while some were bigger than others it was a rare farm that didn’t have even a small one.

The lighter stacked split rail fences could easily be knocked down. Photo: US Library of Congreess
Indeed, many orchards would become famous as the focal point of a particular struggle such as the peach Orchards at Shiloh or on the second day of Gettysburg.
Orchards are treated as broken terrain for movement and block Line-of-Sight (LOS) if a unit is trying to see completely through them. Orchards, however, have no LOS impediment to seeing into them. Orchards provide a -1 DRM target benefit from infantry fire; but, no benefit from artillery fire. Any unit in an orchard is entitled to the -1 MMP cover morale benefit against infantry fire, but not from artillery fire.
I’m an old grognard and I still found this article helpful. I loved the hand drawn diagrams and the idea of using a die or block for flex terrain was wonderful.
I use games to teach history to homeschooled children. Showing them your diagrams and summerizing your main points will be VERY helpful in getting them to understand scale and the abstraction of figure and terrain size.
Good job!
Hi Ken:
I am delighted to hear that you have found material on this website that you can use to teach classroom history. I believe that wargames are not only entertaining, but educational as well. I am glad you have found value. Please feel free to visit anytime. I am a former educator myself, so it makes me happy to hear that you can use this website to help kids understand. Some of the games featured here are available for free, such be sure to check them out.
Sincerely
Stephanie