Below you will find approximately the first 20 pages of the Across A Deadly Field Game Rules. The actual published rule book has the complete set of rules. These first 20 pages set the tone of the game.
The American Civil War – A Period of Transition
The American Civil War raged from 1861 to 1865 and represented a period of rapid development in the art, the science and the technology of war. In 1861, the beginning battles often resembled smaller versions of Napoleonic battles with a wide variety of colorful uniforms, a kaleidoscope of fluttering flags and neatly aligned soldiers with giddy officers seeking glory and fame.
By 1864, however, the grim business of organized killing had reduced almost all the soldiers to a grime encrusted dark blue or a muddy mix of butternut and gray. Petersburg with its long trench lines and maze of obstacles was now more akin to the battlefields of World War I than to the traditional pastoral Virginia low country it had once been. As the war progressed, the armies and carnage grew.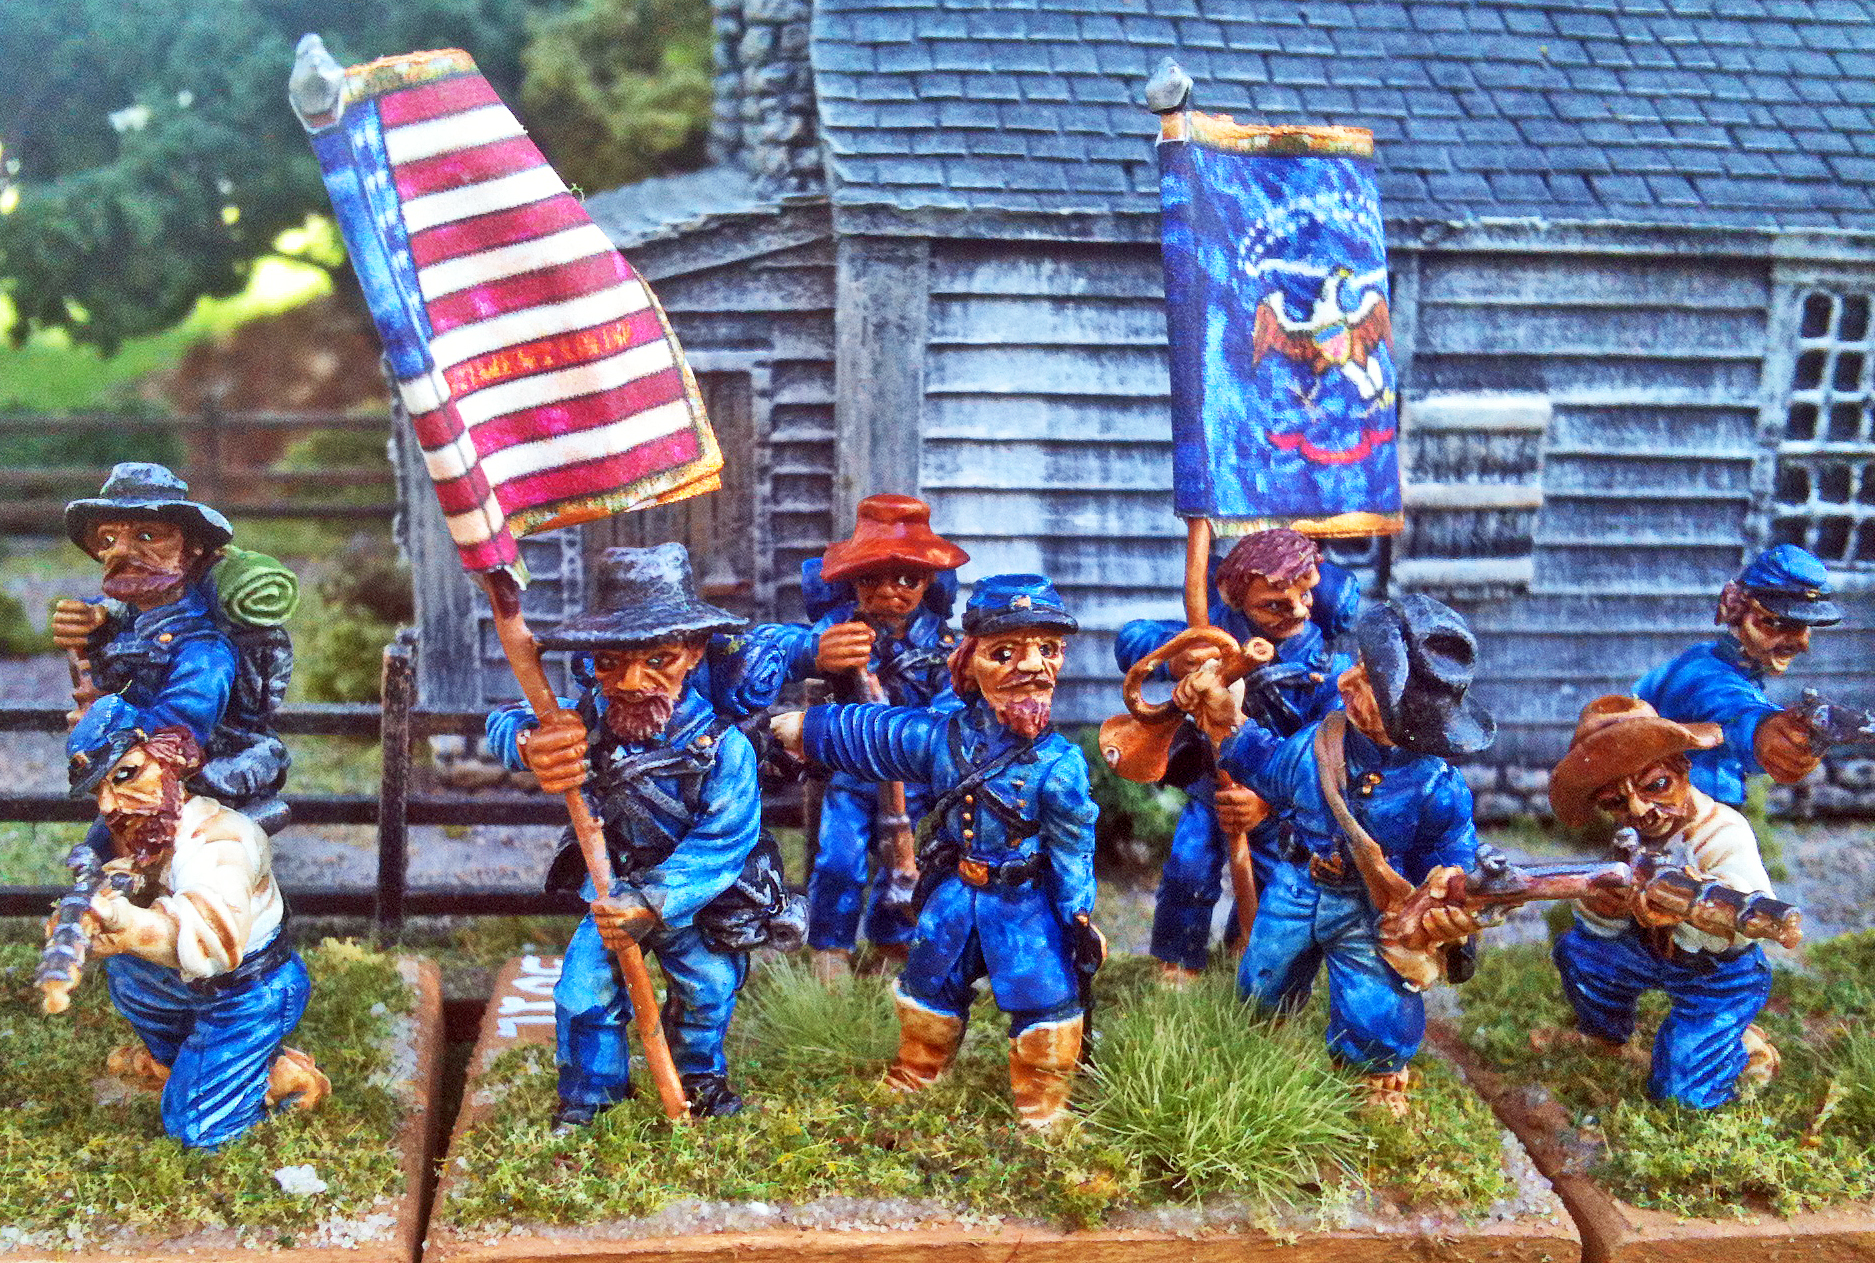
At First Bull Run in July 1861, the Confederates put about 32,000 men in the field against about 35,000 Union soldiers and would lose about 2,000 men while the opposing Federals lost about 3,000. In contrast, in little more than a year later at Antietam in September of 1862, the Army of the Potomac fielded 87,000 troops and its ever present opponent, the Army of Northern Virginia deployed about 45,000 soldiers against it. And the losses had also risen dramatically, with the Union suffering more than 12,000 casualties at Antietam and the Confederates about 11,000.
At the war’s start, despite a sprinkling of West Point trained officers and Mexican War veterans, this was very much a clash of eager and naive amateur armies. But, the soldiers that fought the campaigns of 1864 and 1865 were stone cold killers and were led by experienced and blooded officers. In four short years, the small and relatively inept armies had been replaced by large, thoroughly professional military machines that were now the equal of any contemporary European armies.
Driving these changes was an unprecedented evolution of military technology and growing availability of advanced weapons. In April of 1862 at Shiloh, the Army of Mississippi that surprised Grant’s Army at Pittsburgh Landing went into battle armed mostly with a mix of aged flintlocks and smooth bore percussion cap muskets. However, by 1863 at Chickamauga, the Confederate Army of Tennessee had over eighty percent of its line infantry equipped with relatively modern rifle-muskets.
In the East in 1864, the percentage of modern weapons was even higher, with the Army of Northern Virginia having over 90% of its soldiers equipped with modern rifle-muskets. Their Union opponents, supported by the industrial might of the North, were beginning to field entire brigades equipped with magazine fed repeating carbines and rifles. As individual infantry and cavalry weapons became more lethal, the artillery became ever more so – both, in size and in availability.
At First Bull Run in 1861, almost 75% of the Confederate guns were 6 pounder smooth bores with roughly one gun per 600 men. At Spotsylvania in 1864, however, all the batteries of both sides were now fully equipped with either 12 pounder smooth bores or three inch or larger rifles and both armies were now being supported by about one gun per 300 men. With the increase in both the quality and quantity of small arms and artillery, a shift in battlefield tactical ascendancy was happening.
In the early battles, the winner was usually decided by well timed, decisive shock action or as Stonewall Jackson would stress, “Give them the bayonet!” But by wars end, battlefield dominance was increasingly being decided by firepower supremacy, not massed shock action. The fields separating the two armies had become deadly indeed.
 Gaming the American Civil War
One of the main appeals of the American Civil War (ACW) to the historical miniature gamer is the variety of uniforms, terrain, situations, and weaponry that can be modeled. It has a wide range of well documented battles from the very small to the very large. For the wargamer that is just starting his collection of figures and units, the ACW offers many small battles such as New Market which saw 5,300 Confederates defeating 8,900 Yankees. And for the wargamer who already has sizable ACW armies, the three days of Gettysburg offers many interesting and varied situations that can be presented as separate scenarios or as one combined grand fight.
For the gamer that enjoys painting units with many different uniforms, the early war with its mix of colorful Zouave and militia units will keep him and his paint brush busy for many an hour. As for the gamer that wants to quickly paint and field multiple divisions, the opposing armies of the Atlanta campaign with Sherman’s “bummers” facing the tattered veterans of the Army of Tennessee would be excellent candidates for a quick base coat wash of the appropriate blue, gray or butternut followed by a dry brushing of a ruddy mud color.
For the scenery aficionado, the ACW offers many options beyond the classic flat wargame tabletop with one or two hills and a copse of woods. The civil war was fought over a wide variety of terrain including:
- tidy and well fenced farmlands
- dense pine forests
- rolling hills with deep ravines and sunken roads
- cloud covered mountains and malodorous swamps.
From the lush cotton plantations of the southeast to the arid scrub brush desert of the southwest and everything in between, the civil war soldiers marched, fought and died.
For the wargamer who simply wants to get started quickly with a minimal tactical learning curve, the American Civil War offers the obvious advantage of similar armies with almost congruent tactical organizations and doctrines. By 1863 to 1864, there was very little difference in how the armies were organized and fought. If you can run a Confederate Army of that period, you can easily command its Union opponent.
Across a Deadly Field (ADF) – Game Scales
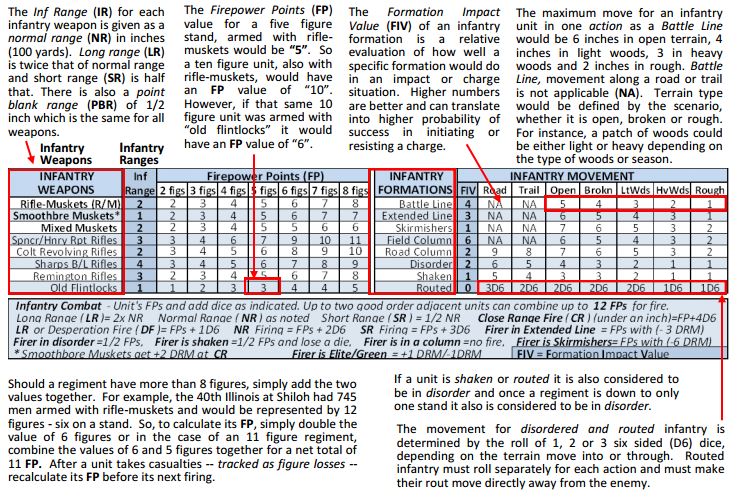
The game scales of Across a Deadly Field are designed for relatively quick play of large battles in a relatively small space within a moderate time span. That is not to say the rules will not work for small battles, because they will. Many smaller scenarios will give a very satisfying afternoon of 19th century miniature combat. However, the real strength of these rules is that they enable the gamer to re-fight larger battles in less space than an over-sized conference table and in less time than a full three day weekend while still showing regiment and battery details. The ground scales are based on the size of the figures being used and are listed in the following pages. For all figure sizes, each infantry or cavalry figure equals 60 men and each gun figure equals one battery with each gun crew figure representing one gun section of two actual guns. The game is resolved using discrete game turns with each turn representing 30 minutes of actual time:
- 6mm, 10mm, or 15mm figures – one inch equals 100 yards and one foot equals 1,200 yards.
- 20mm, 25mm, or 28mm figures – two inches equal 100 yards and one foot equals 600 yards.
A typical game board is shown below, representing a 1,200 by 1,000 yard area of the actual Shiloh battlefield. Depending on the figure size and ground scale used this area could be recreated with one to four square feet of table space. Throughout the rules, distances will be given based on one inch equals a hundred yards, which is the scale for 6/10/15mm figures. If you are using the larger figures, double the given distances appropriately.
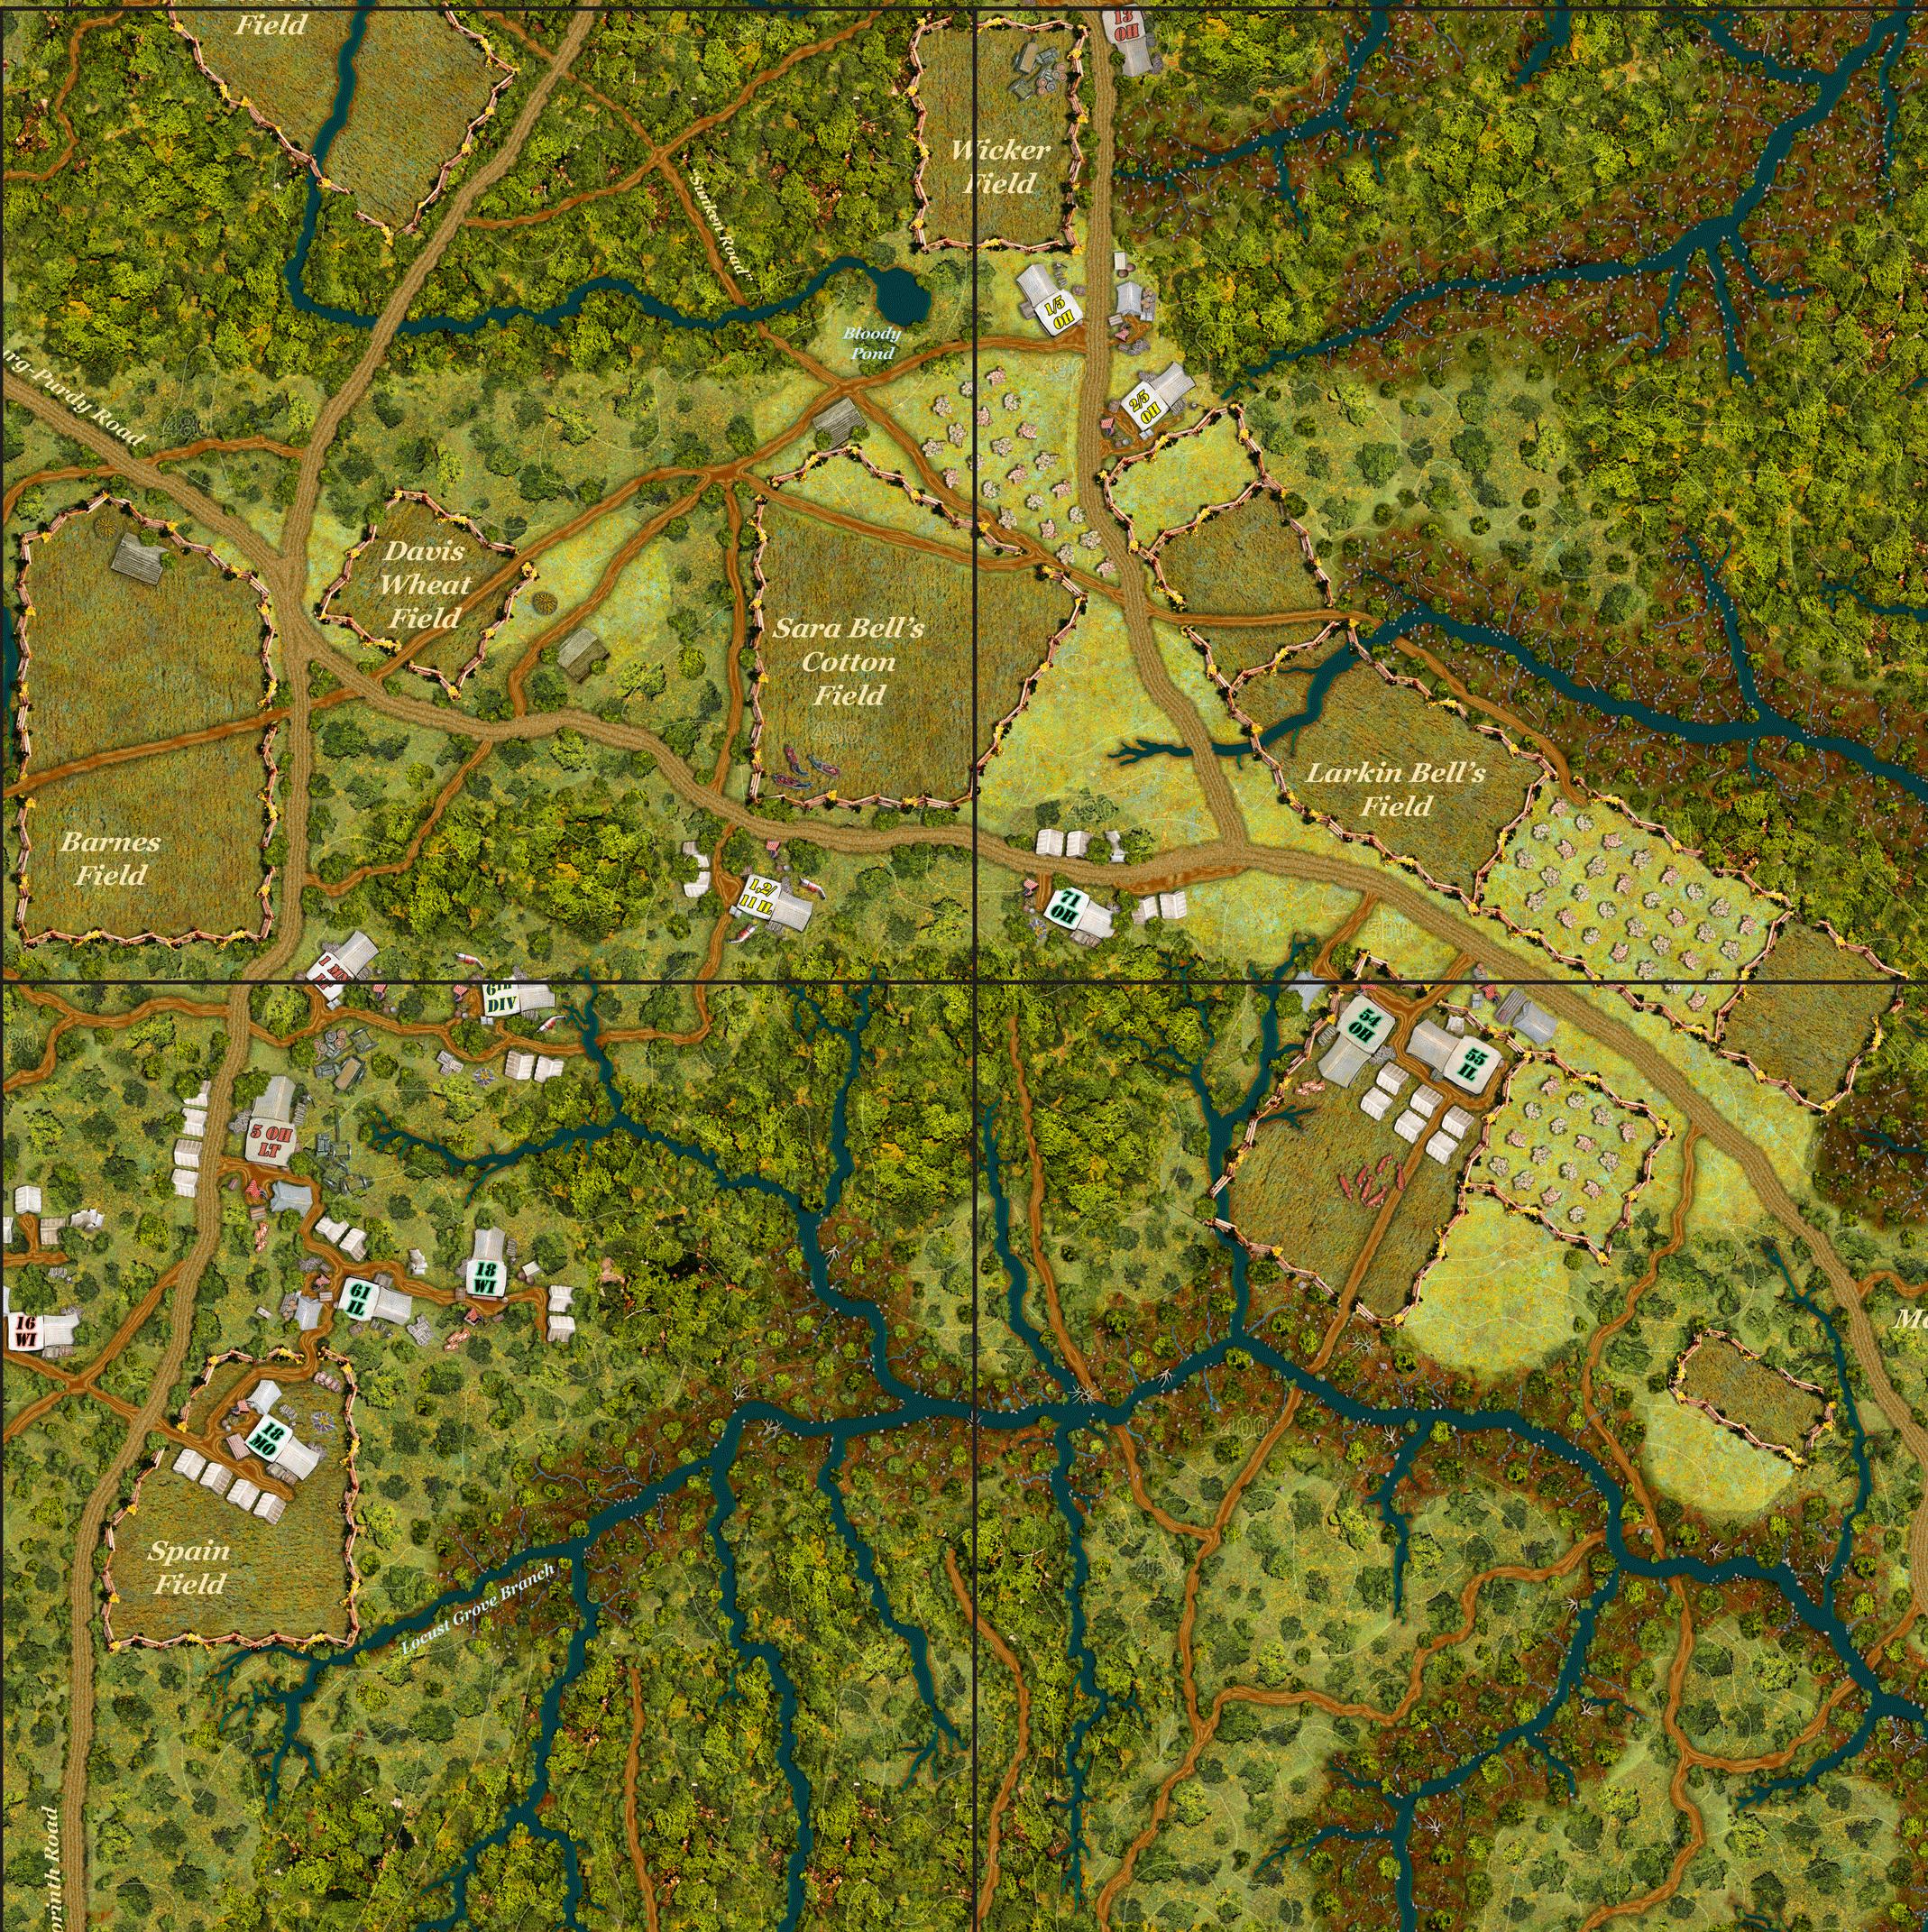
Typical Game Board
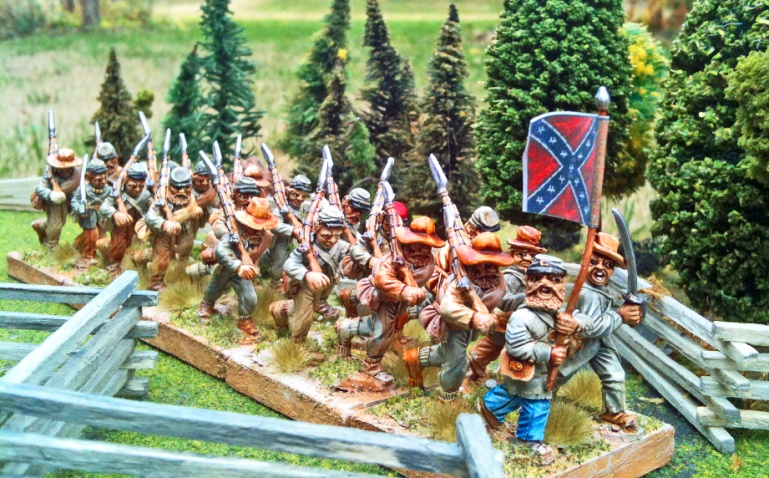
The basic “game units” for Across a Deadly Field are infantry regiments, artillery batteries, and cavalry regiments, squadrons or battalions. An infantry or cavalry unit is represented by two equal or close to equal stands of figures with each figure representing approximately 60 men. An unlimbered artillery battery is represented by one stand without a limber when the battery is deployed. If limbered for movement, both the battery and its limber are placed on the table one behind the other.
Unlike some other rule systems, Across a Deadly Field does not require a specific size of stand or expect any miniature gamer to remount all his figures to conform to the particulars of this rule system. It does not matter if a four figure stand has four figures in a line or in two ranks of two – use whatever stands of figures you already have. Larger regiments with more figures will usually require larger stands than smaller regiments with fewer figures, but that is to be expected as larger regiments would invariably have larger frontages.
To recreate a civil war battle using Across a Deadly Field you will need a few things besides a copy of the rules, the figures and a gaming table. To begin play, each player should have a one foot ruler or a tape measure for measuring distances, multiple photocopies of the Reference Charts (page XXX), at least five six sided dice (6D6) for each player, short segments of pipe cleaners or casualty caps to keep track of figures killed and a simple system to indicate a unit’s current morale state – such as colored pipe cleaners or a handful of pennies painted yellow on one side to indicate a shaken unit and red on the other to indicate a routed unit. Additional pennies could be painted green on one side for disorder and perhaps white on the other to indicate which units have taken their one allowed reaction per turn. Some wargamers prefer to paint individual mounted figures running, falling or dying to indicate casualties or a unit’s current morale. Use what you wish, as long as what they mean is clear to you and your gaming group.
Across a Deadly Field – A Broad Brush Look
Although the rules for Across a Deadly Field portray individual regiments and batteries and resolve combat using those as the maneuver units, the game should be viewed primarily as a brigade level simulation of the civil war battlefield that is resolved on a regimental basis. The gamer that fights the battle using his regiments and batteries as independent scattered elements will soon find his forces at a subtle, but distinct disadvantage when playing against an opponent who deploys and commits his regiments as coherent brigades and joins his batteries into combined gun battalions.
Besides the obvious disadvantage of fighting piecemeal, Across a Deadly Field gives distinct advantages to mutually supported adjacent units that can combine fire, stiffen sagging morale and absorb the survivors of depleted and devastated regiments. That is not to say a single regiment acting alone cannot make a difference. If the situation is right it certainly can, as Joshua Chamberlain and the 20th Maine demonstrated with their gallant counterchange at Little Round Top, thereby saving the Union left flank at Gettysburg.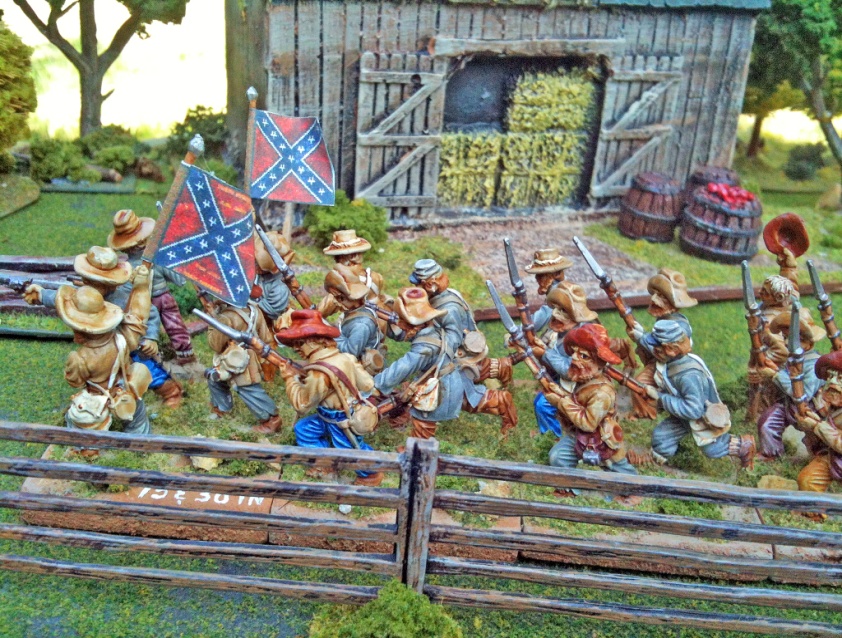
During each game turn of 30 minutes of simulated time, one side will be “active” first with the other side “reacting” to the active player’s fire and movement. Then the rolls will be reversed, with the other side now being active which when finished, will complete one turn. The side that is active first is said to have the “initiative” and that is usually defined by the specific historical scenario being played. For instance, a scenario based on the first day of Gettysburg would usually have the Confederates with the initiative as historically they were the attacker.
In a meeting engagement, the initiative might be determined by a competitive die roll or another scenario defined method. Though die rolling is used to resolve both fire combat and impact resulting from a charge, the luck of the die will seldom be the major factor in determining the outcome of a fire fight or a charge.
The effectiveness of both fire and charge combat is more a function of the size of the opposing units, their weapons, their combat experience, along with their present formation and current morale, with the die roll adding a final degree of unpredictableness to the final result. Morale is a major part of the game and each unit can be at one of four morale levels: good order, disorder, shaken or routed. As a unit’s morale level degrades its ability to perform effectively decreases and as its morale declines its ability to rally back to a better morale also declines along with it.
The rules are presented in a sequenced manner that is designed to get you “into the game” as quickly as possible with a minimum of rule reading before you line up some regiments and begin rolling dice. Within the rules are “tactical hints”, in “gray boxes”, that provide a snapshot of civil war tactics or an example of how the Across a Deadly Field rules can be used to simulate a particular aspect of those tactics. Also interspersed within the rules are “blue boxes” which highlight specific “historical examples” and how the game could have simulated that event. There are also an occasional “green box” that offers related optional rules that can add additional tactical nuances.
Almost all the specific numbers and values that are used throughout the game can all be found on the Reference Charts, which can be photocopied from page (XXX). Once the game is learned, the photocopied Reference Charts may be the only “document” you will need to resolve the vast majority of game situations.
In addition to combat units, the game also portrays individual brigade or higher level commanders. These leaders can provide crucial morale benefits to any unit that a leader is adjacent to. But, should a particularly charismatic leader be killed, the shock of the loss can have an unsettling effect on the very units he was leading and attempting to benefit. This was certainly the case when the popular commander of the Union First Corps, Major General John Reynolds was shot from his horse or when the overall Confederate commander at Shiloh, General Albert Sidney Johnston was killed.
Game Turn Overview
In one game turn, each player will have the option of being both the active player and the reactive player. During one side’s active portion of the turn, each unit or unit group would have the option of two consecutive actions including moving and firing in any order, two moves or two fires, a movement and a charge, a rally attempt or a formation change. In some instances, the actions of an active unit will be restricted. For instance, a shaken unit may not advance towards the enemy and a routed unit must first make a full move away from the enemy for one action and then must attempt to rally for its second action. Also, elite and veteran units will have more flexibility of action than troops that were just trained or freshly recruited.
Depending on the circumstances, the reactive player’s units will almost always have the option to react during the opposing side’s active portion of the turn. A potential reaction can happen immediately following the actions of the opposing unit or even during the opponent’s active movement, if that movement could be seen or was within two inches. In addition to movement, a unit can react to enemy firing, charges, or just about any visible enemy fire or movement activity. But, each unit only gets one reaction per the opponent’s active player turn – so use it wisely.
The most common reaction is a defensive fire; but, in some instances, it could also be a formation change, a countercharge, a precipitous disengagement, or even a desperate attempt to rally a shaken or routed unit. Hence, it is likely that in one full turn, most units would have performed three actions – two active, and one reactive. The specific legal actions and those circumstances that could trigger a reaction opportunity are detailed in the following “Closer Looks” and in various Examples of Play.
A Detailed Look – The Active Player
At the start of each game turn, one side will have the initiative and will be active first, with the initiative almost always being defined by the scenario. Each active unit can perform two consecutive actions. A regiment or designated regiment group – a brigade — must complete its two actions before another active unit or unit group performs its actions. A player cannot have a unit perform its first action and then activate another unit, with the intent of having the first unit do its second action later in the active player’s turn. An action can be a movement, a fire, a formation change, a rally attempt, a disengage or a charge. Hence, a unit could fire and then move, or move and then fire. It could also fire twice or move twice. However, a unit is not allowed to charge twice in one player turn. But, for its first action it could move and then, for its second action, it could then charge. Likewise, it could fire for its first action and then charge for its second action.
Veteran and elite units may change formation by “spending” half their movement allowance during one action. Hence, they can combine a formation change with a half movement as part of one movement action and do both as either their first or their second action. For infantry units, forming or reforming skirmishers is a formation change “action” and veteran and elite units can combine that with a half movement. So, a veteran or elite infantry unit could go into skirmish order and then advance at one half of a skirmish move as one action. Likewise, a veteran or elite regiment in skirmish order could reform into a battle line and then advance one half of a battle line move. But, a trained or green infantry regiment, being less comfortable with the battlefield environment, would take a full action or reaction to change formation.
For artillery, limbering or unlimbering is a formation change action or reaction and a veteran or elite artillery battery could make this formation change by “spending” half of a movement action. A veteran or elite artillery battery could make a half move forward and unlimber in one action and then fire for its second action. Or, it could do it in reverse. Fire for its first action and then limber up and retreat half of a limbered movement for its second action. But, a trained or green artillery battery must use a full action or reaction to limber or unlimber.
Likewise for cavalry, mounting or dismounting is considered a formation change which for a green or trained cavalry unit would take a whole action. But, a veteran or elite cavalry unit could move forward a half move and dismount for its first action and then fire for its second action. Then, in the next turn, it could fire for its first action and then remount and move back a half mounted move for its second action – thereby simulating a classic cavalry delaying action.
In most cases, a fresh unit in good order can do whatever action it wishes. But, as a unit takes casualties and its morale state worsens its range of allowable actions decreases. For example, a disordered unit, while it can do any action it wants, will perform all actions less efficiently until rallied – which takes all units a full action or reaction. A shaken unit cannot advance against the enemy until rallied, and all routed units must use their actions to first flee (one action) and then attempt to rally as their second action. For a more detailed discussion of the four morale levels – good order, disorder, shaken and routed — and how they impact a unit’s options and performance see the Morale Rules.
A Detailed Look – The Reacting Player
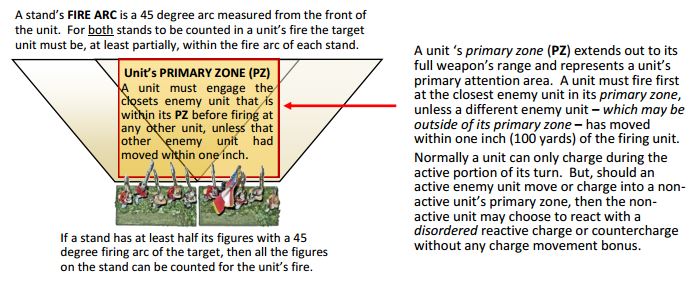
All non-active units potentially have one reaction they can make during the active portion of the opposing player turn. They may react immediately after a fire by an active enemy unit or after an active visible enemy unit has moved at least two inches, completed a formation change, a facing change, or a rally attempt, provided one of the two following conditions or reaction “triggers” listed below are met.
- One – The reacting unit must have a legal Line-of-Sight (LOS) on the active unit that is “triggering” the reaction. Simply put, if you can see the enemy unit, you can react to the enemy unit. However, following any one specific reaction trigger, only one unit or unit group may react. For a second unit or unit group to react, there must be a second reaction trigger either by the same or a different active unit.
For Example: An active infantry regiment moves two inches and the opposing player wishes to do a reaction fire with an artillery battery. The battery reacts and fires and it is resolved with no net effect. The reacting player could not fire another artillery battery at the same moving infantry unit until it moved another two inches or completed its movement, and then a second artillery battery or gun battalion could fire at it.
- Two – The reacting unit cannot see the active enemy unit. However, that active enemy unit has moved within two inches of it, regardless of terrain. At that exact two inch point, the defending unit may react before the active unit continues its movement.
For Example: An active infantry regiment for its first action, is advancing through heavy woods, with a maximum LOS distance of one inch — has moved within two inches of the flank of an opposing infantry unit. As soon as the active regiment has moved within two inches, the reacting unit chooses to make a facing change reaction so that its flank is not vulnerable to a possible charge in the active unit’s second action. However, should the anticipated charge actually occur, the defending unit would only have a one die desperation fire, since it used its one reaction to change facing.
Immediately following either of the above reaction “triggers” the reactive unit may react with a defensive fire, a formation change, a facing change, a rally attempt, a disengagement, or a countercharge if charged (veterans and elites only) and with the exception of the countercharge, all units are capable of doing this. The selected reaction is completed in its entirety, including any resulting morale checks by either friendly or hostile units, before the currently active unit continues with its movement or begins its second action.
For example: A active visible Confederate unit has just moved into short range of a Union artillery battery and that Union artillery battery chose to immediately fire at that point. That defensive reaction fire is immediately resolved along with its effect in terms of possible figure losses or morale checks, before the active unit is allowed to continue moving. If the Union battery’s reaction fire caused the moving Confederate unit to rout, and if that routed unit passed within one inch of other friendly units, then those Confederate units would also have to check morale to see if they joined the rout. In all cases, should a reaction event trigger a sequence of other events, those events are played out to completion before the active player continues with his portion of the turn.
If the reacting unit chose to “reform” from disorder, it can reform and face any direction it chooses. If the reacting unit chose to “disengage”, it immediately retreats a doubled disorder distance directly away from the enemy and ends its turn, in disorder, facing the enemy. On a disengage movement – either as a reaction or an action – the disengaging unit may pass through other friendly units by paying a one inch movement penalty’ but, with no adverse effects to the units that were passed through.
For example: If a Federal regiment in extended order and deployed four inches ahead of a solid Union brigade battle line in light woods, unexpectedly found itself threatened by three advancing Confederate regiments, its safest option might be to disengage and fall back behind the formed battle line. Using its reaction option to disengage, the exposed Union regiment could immediately fall back six inches — twice the usual 3 inch disorder in light woods. If it chose to end its turn behind the friendly blue battle line, it would have had to pay a one inch cost to pass through the brigade line, a for a total move of five inches. It would ends in disorder and facing the enemy. Historically, the battle line seeing its forward element retreating would temporarily make space between its ranks to allow the regiment to pass through with little effort.
In addition to the reactions that all units can do, a veteran or elite units also has the reaction option of “charge-if-charged”. The reacting unit can only charge an enemy unit that is charging it. The two opposing units will impact midway between their starting positions. In a “charge-if-charged” situation both sides must take a morale check at one inch from impact and prior to Charge Impact Resolution and the results of those morale checks are factored into the Charge Impact Resolution. In a “charge-if-charged” Impact Resolution, the countercharging unit is treated as if he was the defender and the winner may advance one inch less than the loser retreats.
Each non-active unit may perform only one reaction during the enemy’s active portion of the turn. There is no limit on to how many units or unit groups might actually get a reaction opportunity during the turn or be triggered by an active event, provided each of the above listed requirements and restrictions are met.
On the other hand, it is possible that a very lethargic active player may not have done any action that would trigger a reaction; hence, there is no minimum number of reactions that must occur during the opponent’s active portion of the turn. When a unit chooses to do a reaction, mark it with a penny or some other indicator to show that it has used its one reaction for this turn.
If the reacting unit or units pass on the reaction opportunity, they may not choose to “go back” and do it after a different active enemy unit has performed an action or if the same unit has begun its second action. A reaction opportunity is just that — a fleeting tactical opportunity – use it or lose it. However, the reacting unit could delay his reaction until the specific enemy unit that triggered the reaction has completed his action. A reacting unit only gets one reaction option per turn.
A unit is not obligated to make a reaction following a legal active event “trigger”. A unit or unit group can choose not to react. It may choose to wait for another potentially better reaction opportunity from the actions of a different enemy unit or even from the same enemy unit’s second action. For example, a defending unit may chose not to fire during an advancing enemy’s first action, even if that enemy unit had advanced against the defender and was in sight. The defender may choose to wait until the advancing unit’s second action, anticipating that the enemy unit move closer or charge.
Performing a defensive opportunity fire will probably be the most common reaction. But, another useful option would be that of a rally attempt or reforming from disorder after a unit failed a morale check following a particularly nasty enemy fire. In some situations, another useful reaction option could be, “to disengage” — whereby the reacting unit, in an effort to extract itself from a dangerous situation, takes a double disorder move directly away from the enemy, ending its reaction move in disorder, but still facing the enemy.
If a unit has performed a reactive fire against a unit, it could still do a one die desperation fire against any enemy unit once that enemy unit has moved within an inch of the defending unit. The most likely time this would occur is when an active unit is charging the defender and the defender has already done a reaction fire. In the case of a charge, the defender would have to take a pre-impact morale check as the attacker reached one inch and before taking his one die desperation fire – which only occurs after the attacker has moved within an inch from the defender. However, if the active unit simply moved, without charging, within an inch from the defender, then the defender would not have to take a “pre-impact” morale check before doing his desperation fire.
Unless an active unit is charging it may not move to impact, but always stops just under an inch from the defender. There is no limit on the number of desperation fires a unit could make in one turn, provided all the desperation fires were against different enemy units and all of those units had move within an inch of the defender. Even if a charging enemy unit had already received a reaction fire from a defending unit outside of one inch, that defending unit could still perform a desperation fire after that same charging or advancing unit moved within one inch of the defending unit.
The Infantry Regiments
Throughout the Civil War it was the infantry that shouldered most of the fighting burden, though as the war went on the combat contribution of both the artillery and cavalry steadily increased. Nevertheless, the vast bulk of the dying continued to be the lot of, “the poor bloody infantry”.
The main infantry organizational unit was the regiment and the miniature infantry units for Across a Deadly Field reflect this. On paper, a civil war regiment contained 10 companies of 100 men each for a total of 1,000 men and with regimental officers and support personal a regiment could, in theory, have had a total of about 1,100 to 1,200 men. This, however, was rarely the case.
In the early years of 1861 and 1862, the average strength of a Union regiment was about 600 men with the Confederates being less. However, at any given battle the actual field strength of the specific regiments could vary quite a bit. For instance, at Shiloh in April 1862, the Union Army of the Tennessee’s regiments averaged 590 men; but, the 78th Ohio had slightly more than 800 men, while the 25th KY barely had 250. For the opposing Confederates in the Army of the Mississippi, regimental strengths varied from 800 in the 22nd Tennessee to 270 in the 44th Tennessee.
Throughout most of 1863 as attrition took its toll, the average Confederate regiment averaged 400 soldiers while the Union regiments averaged about 340. The slightly higher Confederate strength was due to their general practice of using their new recruits as replacements for existing regiments while the Union often preferred to use them to establish new regiments.
By late 1864, however, the Union had mobilized enough manpower – albeit, mostly new draftees — to do both and the Union regiments were holding at approximately 400 men while the Confederate average regimental strength had dropped to about 260 men per regiment. By 1865, southern manpower reserves were at the bottom of the barrel and when the Army of Northern Virginia surrendered at Appomattox its regiments averaged only about 140 men.
An infantry regiment could deploy its ten companies in many ways depending on the tactical situation, its assigned mission and the amount of frontage it was expected to control. A regiment of about 500 men, in a two rank deep line, usually would occupy about two to three hundred yards of battle line. That could vary substantially, depending on how many companies the regimental commander wanted to put in reserve and how many would be pushed forward as skirmishers.
One fairly standard practice was for the regiment to push two companies out from 200 to 400 yards as skirmishers and have two companies held back about 200 yards behind the main battle line as a reserve, which would leave six companies on the main battle line. On the march in road column, a brigade of four regiments might begin by occupying about a thousand yards; but, as the march dragged on the inevitable straggling would cause that distance to stretch out. In theory, infantry columns marching on a road could move at about three miles per hour. However, the inevitable delays, stops and starts almost always reduced that to about two miles per hour.
On the battlefield, a brigade would occupy whatever frontage was required. For an assault, the regiment would often form an attack or field column with a frontage of only one or two companies, with the intent of having a very narrow frontage so as to break through a position with sheer mass and momentum. On such occasions, the regiment would often be ordered to charge with empty or uncapped muskets to make sure the soldiers did not stop to fire.
The attack column had numerous variants depending on the spacing between the companies from less than 25 yards — so as to form a solid battering ram of men — to over 200 yards between the lines, so that the companies hit the defender in waves. On the other hand, regiments and brigades could stretch out to cover much larger distances. For example, on the first day of Gettysburg, the brigade of Brig. Gen. Alexander Schimmelfennig with about 1,600 men using a combination of extended order and skirmishing stretched out to cover almost 1,400 yards of battle space. To extend that far, however, was almost certainly a mistake, as Schimmelfennig was soundly defeated.
With this in mind, since Across a Deadly Field uses one figure per 60 men the game regiments will not precisely reflect exact historical strength, but would be approximately correct within 60 men. Some sample regiments are illustrated below along with the most common formations used by the individual infantry regiments. While most two stand regiments will be depicted with an equal number of figures per stand, the game will work well enough if one stand has one figure more or one figure less than the other stand. In that case, take casualties off the smaller stand first.
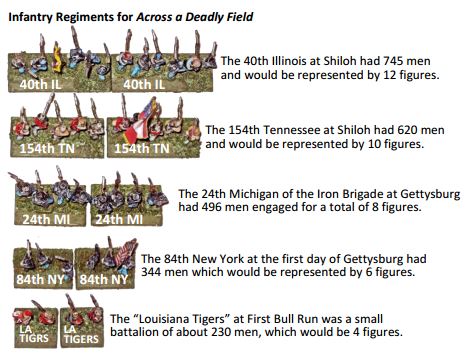
Infantry Regiments for Across a Deadly Field
Infantry Capabilities
An infantry regiment’s basic combat capability in Across a Deadly Field is based on its firepower which is a function of the regiment’s manpower, its weapons, and its combat experience. In the game, however, a unit’s actual fire effectiveness is usually modified by the unit’s current morale, its losses, target range, and current formation.
Almost all the information needed for regimental infantry combat is contained within the Infantry Section of the Reference Charts which can be copied from page (XXX) and is detailed below. An infantry regiment conducts fire combat by using its Firepower Points (FP) as listed in the Reference Chart and adds to its FP the roll of one, two, three or four dice depending on range and situation.
Other specific circumstances that impact both the firer and the target unit are simulated with Die Roll Modifiers (DRMs). For instance, if a firer is
The Infantry Formations and Showing Casualties
an “elite” unit, that unit will also get an additional “+1 DRM” to the die roll; likewise, if the firing unit was “green” he would suffer a “-1 DRM” from his die roll. A disordered unit would fire with half FPs, but would still be rolling the same number of dice based on range.
On the other hand, a shaken unit has half FPs and rolls with one die less. A routed unit does not fire at all – it is too busy running. There are also beneficial and detrimental target DRMs that may apply to any fire, such as enfilade fire which increases casualties and certain types of cover which reduces casualties. These and other possible modifiers for infantry fire are summarized on the Infantry and Fire Combat sections of the Reference Chart.
Infantry Capabilities
Infantry Formations and Movement
Battle Line Movement:
- While most Battle Lines would be two men deep, the actual regimental frontage could vary significantly depending on how many companies the regimental commander wanted to deploy forward as skirmishers or hold “off the line” as a reserve. After a few volleys the commanding officer would frequently give the command of, “fire at will” and very quickly the neat two rank line would shake out as each man found his own position for firing and reloading as he saw fit. This invariably resulted in the regiment adapting its frontage to whatever was required at the moment, along with shrinking and expanding as casualties occurred or new companies were committed.
- Almost all forward infantry movement for a Battle Line is confined to within a unit’s frontal arc – which is defined as being 45 degrees in front of the deployed unit. If a Battle Line desires to “wheel” before, after, or during its movement, the wheel is done by pivoting on one stand with the distance being measured from the outside edge of the wheeling unit.
- A Battle Line may move backward while still facing the enemy, at half its normal movement allowance. If a Battle Line elects to move outside of its frontal arc it does so in Disorder and moves at the disorder movement rate.
- A Battle Line may change into a Road Column by performing a front-to-flank maneuver either at the start of its movement by spending its Basic Morale Point (BMP) in inches off its road column movement allowance. However, to change from Battle Line into an Attack Column takes a unit a full action or reaction.
Extended Line Movement:
- An Extended Line is a Battle Line that has “extended” itself to cover more area. Even though it represents a loser formation than a Battle Line it has the same fire and movement arc restrictions.
- When an Extended Line fires, its volleys will be a bit more ragged and so when it fires, it does so with a “-2 DRM”. However, since it is a looser formation with more spacing between the men, it moves slightly faster than a regular Battle Line and when targeted, its more open formation earns it a “-2 DRM” from artillery fire or a “-1 DRM” from infantry fire. But, if charged it will have less Final Impact Value (FIV), due to its formation Charge Morale Modifier (CMM) of “+1”
Skirmisher Movement:
- Skirmishers are the loosest of all the infantry formations and where used primarily to find the enemy or to prevent being surprised by the enemy. Since they were not required to maintain a strict formation they could move relatively quickly through broken or rough terrain. If unexpectedly pressed by formed units, they would almost always fall back having completed their mission of locating the enemy.
- In open terrain with good visibility, a single regiment might use only one or two of its ten companies as skirmishers. But, in woods or broken terrain where sighting was limited, sometimes up to half the regiment might be sent forward as skirmishers. By wars end, many brigades and divisions had specifically designated regiments or battalions of sharpshooters with skirmishing being their primary mission.
- Skirmishers are not limited to movement within the 45 degree frontal arc.
- As skirmishers, each stand of the two stand unit can move in any direction, provided that the correct skirmish distance between them – from one to two stands apart – is maintained throughout the move. If fired on, the skirmishers very open formation earns them a target benefit of “-3 DRM” from artillery fire and a “-2 DRM” from all other fires. But, their own ragged harassing fire is reduced by a “-2 DRM”.
- A unit in skirmish formation is not allowed to move closer than just outside one inch of any enemy unit. Depleted units with only one stand are defined to be in disorder and hence they may not be used as skirmishers. That, however, does not apply to specially designated one stand sharpshooter units. If charged by anything other than other skirmishers, it is unlikely a skirmish line would stand as their CMM is a “+6” which means that their morale would be “6 points” worse than a Battle Line if charged by one.
Attack Column Movement:
- Attack columns move with both stands facing forward with one ahead of the other. The front stand of the lead unit is allowed to pivot in any direction with an additional movement cost of one inch with the rest of the unit following behind.
- An attack column can make as many turns as desired during movement – at the cost of one inch per turn, provided that the front stand takes the lead and the rest follow.
- An attack column was often referred to as a, “field column” which may only have a one or two company frontage, does not have muskets on line for an effective fire and hence units in attack columns cannot fire.
- However, its Charge Morale Modifier (CMM) of “-2” is the best of all the regimental formations and consequently is an excellent charge formation as in terms of “charge morale” it makes an experienced unit equal to an elite unit. However, its dense formation make the attack column it more vulnerable to fire and consequently if fired on by it suffers as if it was enfilade fire.
Road Column Movement:
- Road columns move with one stand ahead of the other in a lengthwise order with each stand pointing in an opposite direction. Though intended primarily for movement along a road or trail, a road column can be used in any terrain.
- A road column cannot fire unless it has first performed a front-to-flank maneuver which changes the road column into a battle line and costs the road column its basic morale point (in inches) off its total road column movement, at the end of its road column movement.
- Since an actual road column would only be four men across, it can turn and change facing without paying the one inch turning penalty common to the attack column.
Changing Formation – Any good order unit can change its formation by spending one action or one reaction. Any veteran or elite unit can change its formation by spending half of it movement allowance during one movement action either before or after its movement. However, any green or trained unit takes a full action or reaction to make a formation change of any kind.
Disorder Movement:
- Any unit that fails a morale check immediately goes into disorder or worse. A moving good order unit that fails a morale check immediately goes into disorder and loses any remaining movement for that action or reaction.
- Units in disorder — including all single stand units that have not been merged with or attached to another unit — may move in any direction provided their disorder status is maintained throughout the move. Shaken units are also in disorder and they may not advance against the enemy.
- Routed units are also in disorder and must move away from the enemy until rallied.
Example: A good order infantry regiment moving for its first action in Battle Line takes fire and fails a morale check causing it to immediately halt and lose any remaining inches of movement for its first action. However, if desired, it could continue its forward movement, in disorder, for its second action. Or, for its second action, it could fire a volley or reform from disorder.
Reforming – Since disorder also represents a degraded morale state, it takes all disordered units – green, trained, veteran or elite — a full action to reform from disorder including both veteran and elite units. However, no die roll is required to reform from disorder.
Disengaging – A disengage movement can be done either as an action or as a reaction. Any infantry or cavalry unit can disengage, but artillery cannot. In simple terms, the regiment has found itself in an untenable position and has decided to run. A disengaging unit must move directly away from the enemy and makes the move entirely in disorder – but, at twice the disordered movement rate. However, since such a panicked move would almost certainly further degrade a regiment’s internal cohesion, the disengaging unit ends the move one morale level worse than when it began. Hence, a good order unit ends a disengagement move in disorder; a disordered unit ends it as shaken, and a shaken ends it as a routed unit.
Routing – Any unit can rout following a seriously failed morale check or even a barely failed morale check if the unit was already shaken. A rout can occur almost any time during an action or reaction. If a unit routs, immediately roll one, two or three dice for distance in inches depending on the terrain the unit is routing into. The routing unit is assumed to be in disorder and must rout directly away from the enemy. If the unit begins its active turn routed, then it must use its first action to continue its rout movement per the above die roll and use its second action to attempt to rally.
Fire Combat
Morale Overview
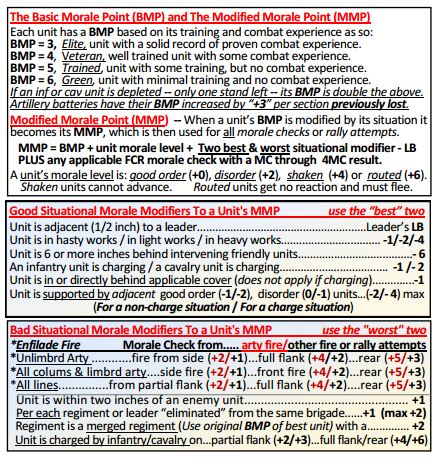
BMP & MMP Reference Chart
A unit’s basic quality is defined as being, green, trained, veteran or elite which summarizes a unit’s overall internal cohesion, training, experience, discipline and basic morale. This inherent core quality of a unit is quantified as a unit’s basic morale point (BMP). However, throughout most of the game, the players will be using a unit’s modified morale point (MMP) which is a numerical summation of the unit’s BMP, its current morale level, and the impact of any immediate combat events such as losses, friendly unit support, or a difficult tactical situation. These elements combine together to determine a unit’s MMP at any one specific point in the game. The four morale levels and their numerical “fear values” that are added to a unit’s BMP are: good order (+0), disorder (+1), shaken (+2), and routed (+4).
At various times during the turn, a unit may be required to take a morale check to determine how the unit responds to any one particularly stressful event, such as taking casualties or if it was adjacent to a friendly unit that suddenly routed.
At that time, a unit must roll equal or higher than its MMP with two dice to “pass” the morale check to not get any worse. But, depending on how “good” or how “bad” was the die roll the unit could get better or worse.
To rally a unit from disorder to good order that unit must spend an action or reaction – but, no die roll is required. It is automatic. But, to rally a unit from a shaken or a routed condition – a more difficult event — and thereby improve a unit’s morale will require that the unit spend an action or reaction and roll higher than its MMP. If a unit rolled exactly its MMP the unit does not get any worse — a shaken unit will stay shaken and a routed unit will continue to run. A unit’s MMP for most morale checks and all rally attempts is calculated as follows:
MMP = BMP + Unit’s Morale Level + Its One Best Situational Modifier + Its One Worst Situational Modifier
If a unit fails a morale check and goes into disorder or worse, it is no longer in whatever formation it was in, but is now in disorder. Hence, if a skirmishing regiment in good order fails a morale check it is no longer in skirmish formation, but is now in disorder. Exactly how specific situations impact a regiment’s MMP and how unit’s current morale level can change during the turn is discussed in detail in the following morale sections.
The Basic Morale Point (BMP)
Each unit as was noted, has a Basic Morale Point (BMP) that is based on the amount of its training and previous combat experience and each unit also has a Modified Morale Point (MMP) which combines its BMP along with its current battlefield situation. If an infantry or cavalry unit has lost its first stand and is now only one stand strong, it is said to be depleted and its depleted BMP is double that of its normal BMP. Since an artillery battery has only one stand, it does not have a specific depleted configuration; but, rather has its BMP increased by “+2” for each section that has been eliminated.
- BMP = 2, An Elite Unit represents one of those few battle hardened units with a consistent record of proven combat experience over at least two years of military service. These will probably be relatively small battalions of men that have held the line despite serious losses and may only falter when the pressure has finally become truly unbearable. In simple terms, war suits them and even if depleted an elite unit will still have a BMP of 4.
- BMP = 3, A Veteran Unit represents a fully trained unit that has proven itself in at least one major battle and will give steady performance in most combat situations. However, even a veteran unit may start to waver once their ranks become depleted or should they face difficult odds. A veteran unit will have a depleted BMP of 6.
- BMP = 4, A Trained Unit represents a unit that has had at least three months of training and drill and is comfortable with its weapons and familiar with the basic combat formations, though under the stress of combat quick changes in formation would still be problematic. It has not seen serious combat beyond occasional light contact. Due to their time in uniform, these units will prove generally reliable as long as not too much is asked of them or until they start to suffer moderate casualties. A trained unit will have a depleted BMP of 8.
- BMP = 5, A Green unit represents a unit with minimal training and no combat experience. These units may have been recently recruited and while they have had some weapons training and some drill they will take longer to make formation changes and will probably be somewhat unsteady and quick to run under the stress of their first combat. A green unit will have a depleted BMP of 10.
The Modified Morale Point (MMP)
As was noted, a unit’s BMP is modified by both a unit’s current moral level and by various battlefield situations – both good and bad. When a unit checks morale or attempts to rally, it will usually be its Modified Morale Point (MMP) that the unit must roll with 2D6 equal or higher than to pass. Beneficial circumstances lower a unit’s MMP – making it easier to roll higher than — while detrimental situations raise it. A unit will always be at one of four morale or “fear” levels, starting out with “good order” and then degenerating into “disorder”, then “shaken”, and finally “routed”. When a unit fails any morale check or rally attempt, it may drop one or more morale levels depending on how bad it failed the morale check. Likewise, when a unit passes any morale check or rally attempt – depending on how high the dice were rolled — a unit could go all the way from routed or shaken to good order. But, don’t count on it.
The game mechanics for rallying and morale checks are basically the same except that while morale checks are mandatory per specific situations and rally attempts are generally voluntary, except for routed units. A unit is disorder can rally to good order by simply spending an action or reaction – no die roll is required. A rally attempt for all other morale levels, however, requires a die roll and the spending of an action or reaction. Detailed descriptions of the four morale levels, the penalty they add to a unit’s MMP, and the game restrictions placed on them are listed below:
- Good Order (+0) – A relatively fresh unit, formed up and ready to fight. It has no movement, morale or fire penalties.
- Disorder (+1) – The unit‘s formation has become ragged and unit cohesion is less than optimum. A unit in disorder may perform all actions, but its fire effectiveness, morale and quickness of movement are degraded. To rally to good order costs all units a full action or a full reaction; but, unlike recovering from shaken or routed, no die roll rally attempt is necessary. From disorder, rallying is automatic with the spending of one action or reaction. A unit in disorder has a +1 detriment to its BMP and has its Firepower Points (FP) reduced by half when firing – but, still gets to roll the same number of dice for firing as a good order unit.
- Shaken (+2) – The unit has become visibly distraught and is starting to waver as individual soldiers start to drift to the rear. A shaken unit is in disarray and may not advance against the enemy until it is successfully rallied to disorder or good order. However, a prompt rally attempt – while generally recommended for a shaken unit – is not mandatory. Except for being prohibited from moving towards the enemy, it may continue to fight as it is. A shaken unit will have a +2 detriment to its MMP and when firing, it has its firepower points (FPs) reduced by half and losses one die.
- Routed (+4) – The unit has lost all unit cohesion and discipline and is fleeing from the battlefield in total fear, confusion and disorder. During the active portion of a routed unit’s turn, a routed unit must spend its first action running directly away from the enemy and its second action attempting to rally. A routed unit has no reaction capability. One of the few benefits a routed unit has is that it cannot be forced to take another morale check as it is already completely terrified. Also, it cannot be fired upon or defined as a charge target because a routed unit is clearly not a threat. A routed unit has a +4 detriment to its MMP and cannot fire.
- Routed Artillery – If an artillery battery fails a morale check and routs, note whether the natural die roll was even or odd. If the die roll was even, the gun crews have abandoned their guns and have fled the battlefield – remove the battery from the game. However, if the die roll was odd they limber the guns and roll for rout distance as a limbered battery.
There are many ways to “mark” or “track” a unit’s morale. One quick and easy way is to place painted pennies by the unit. A green painted penny would indicated that the unit is in disorder, a yellow painted penny would indicate that the unit is shaken and a red painted penny would indicate that unit is routed. If painted pennies are used to indicate morale, one side could be painted yellow and the other red to quickly “change” a unit’s morale.
The Good Situational Morale Modifiers
At any one point during the battle, a unit’s current morale condition will be very much determined by its exact situation which can vary from exceptionally good to terminally catastrophic. There are a number of both “good” situational modifiers and “bad” ones. In regards to the “good ones”, which reduce a unit’s MMP number, the gamer can only “claim” the “best” one – with the exceptions of an adjacent leader and the beneficial Charge Morale Modifier (CMM) of “-2” if the unit is charging while in attack column. In those cases, the leader’s benefit (LB) and/or the CMM, can be included in addition to the “one best” situational modifier. For a leader to be “adjacent” he must be within ½ inch (50 yards) of the unit claiming his benefit. No matter how “good” the final net benefits are, a unit can never have an MMP better than “2”. The “good” situational modifiers are:
To “claim” the MMP cover benefit a unit must be behind a wall or fence or in an area, such as heavy woods, that gives the unit a beneficial target DRM of at least a ”-1 DRM” against the type of fire being received. For example, if a unit took cover behind a wood fence and had to check morale from infantry fire – it would be entitled to a -1 MMP modifier. But, if that same unit had to check morale from artillery fire it would not get the -1 MMP modifier benefit since a wood fence has no DRM cover benefit from artillery fire. Also, if the unit is charging it would not get the “cover” MMP benefit, since it is abandoning its cover to make the charge.
- Unit is supported – has friendly unit(s) adjacent to its flank / rear…………………………………………… –1/-2 to MMP
To “claim” the MMP support benefit , the “supporting” unit or units must be adjacent – within ½ inch – and the supporting MMP benefit for two or more supporting units is limited to a “-2” no matter how many units are “supporting”. - Unit is in hasty works / in light works / in heavy works…………………………………… ……. …………. -1/-2/-4 to MMP
The above benefits for being behind fieldworks only applies if the fieldworks are between the unit and any threatening enemies. The defender can claim this benefit during Charge Impact Resolution if the charge is coming across the works. If a fire combat result (FCR) called for a Morale Check (MC, 1MC, 2MC or 3MC) from fire that did not come from across the works – for example, the works had been turned – then the above beneficial MMP modifiers would not apply. - Unit is 6 or more inches behind intervening friendly units…………………………………………………………. -6 to MMP
This benefit will usually prove useful for rallying units behind friendly lines. But, if any hostile unit has a legal line-of-sight (LOS) unblocked by intervening terrain or friendly units and is within long weapons range, then this benefit would not apply. - An infantry unit is charging /a cavalry unit is charging…………………………………………………………….. -1 /-2 to MMP
This benefit only applies to a unit while it is charging and during its Charge Impact Resolution. If a charging unit fails a morale check, the benefit is immediately lost. Also, this benefit ceases to apply after the conclusion of Charge Impact Resolution.
And, as was noted, if a beneficial leader is adjacent (within ½ inch) his leadership benefit (LB) can be applied in addition to the one best situational modifier as listed above.
The Bad Situational Morale Modifiers
In addition to the “good” situational modifiers, there are the “bad ones” which raise a unit’s MMP number. As with the “good ones”, a unit is only penalized with the one “worst” of the bad situational MMP modifiers, with the exception of the formation specific charge morale modifiers (CMM) if and when applicable . No matter how “bad” the final net MMP penalty is, a unit can never have an MMP worse than “12”. The “bad” situational modifiers are generally of two types, with the first type being those associated with enfilade or flanking fire. Enfilade fire is when the firing unit is on the flank of the target unit and has the ability to fire down the line of infantry, lengthwise through a column or along a line of guns and thereby increasing both the casualties and the severity of any resultant morale checks Consequently enfilade fire carries both fire target DRM penalties and morale check MMP penalties. The three other situations that carry an MMP penalty are:The Bad Situational Morale Modifiers
- Per each regiment or leader “lost” from the same brigade…………………………………………………… +1 (max+2)
For each element – regiment, battery or leader — that an infantry brigade has had eliminated, all the remaining regiments in that brigade have a consistent +1 MMP modifier to their morale beginning with the turn immediately after that regiment or leader was lost, up to a maximum total penalty of +2 to their MMP. - Unit is within one inch of a visible non-routed enemy unit………………………………………………………………….. +1.
This particular penalty is applied only if at the exact point that the morale check is being taken there is a non-routed visible enemy unit within one inch. It is not applied if the enemy unit was temporarily within one inch prior to this specific morale check. The most common applications of this penalty would be for the Defender’s Pre-Impact Morale Check, which is taken when a charging enemy unit has closed within one inch of the defender. This morale check is taken prior to a defender taking an “under one inch” close range fire (CRF) and before Charge Impact Resolution. - Defending unit is charged by infantry/cavalry on………………….partial flank (+2/+3)…………full flank/rear (+4/+6)
The determination of “charged on partial or full flank” is resolved the same way that a partial or full enfilade fire is done using the target unit’s 45 degree forward arc. The above MMP modifiers would be used both in the defender’s pre-impact morale check and in the final Charge Impact Resolution. As can be expected, the morale detriment if charged on flank by cavalry is worse than if charged on flank by infantry.
In addition to the above “bad” morale modifiers, the formation specific Charge Morale Modifiers (CMM) – with the exception of the attack column – all degrade a unit’s morale during a charge. For instance, an extended line in a charging situation, whether attacker or defender, will add a “+1” to its MMP for any charge related morale checks including those from any defensive fire while charging, the defender’s pre-impact morale check, or the charge impact dice down itself.
How and When to Check Morale
A unit must take a morale check with immediate results following any of the situations listed below. To “pass” a required morale check, a unit must roll equal or higher than its current MMP with 2D6. It is possible that the unit might significantly improve its morale level with an exceptional die roll. Likewise, with a really bad roll it could get substantially worse. For any morale check or rally attempt, the unit’s MMP could be modified by the one “best” favorable situational modifier and the one “worst” situational modifier along with any modifiers called for by a fire combat result (FCR). In the case of multiple “required” morale checks, the unit only has to take the worst of the required morale checks. A morale check is required when the following events occur:
When required by a fire combat result (FCR), such as a MC (morale check) or a 1MC or 2MC, which are progressively more difficult morale checks as the unit’s MMP is respectively increased by a “+1”, or “+2” for this specific morale check. The FCR morale modifiers of 1MC or 2MC are applied, in addition to any applicable Situational Morale Benefits or Penalties. Likewise, if the Fire Combat Result was a 1H, 2H, 3H or 4H – indicating that many “hits” and that many figures or gun sections lost – a morale check must be taken with the unit’s MMP increased by the number of hits suffered from this specific combat result. Should a FCR morale modifier be required, the net MMP for that specific morale check would also include the FCR morale modifier as follows:
Doubled if an infantry or cavalry unit was depleted prior to this specific morale check
MMP = BMP + Unit’s Morale Level + The Best Situational Modifier + The Worst Situational Modifier + FCR modifier
Good order(+0), disorder(+1), shaken (+2) or routed (+4) — prior to this specific morale check
As indicated above, for any one specific morale check the unit uses its BMP and Morale Level prior to the combat event that trigger this specific morale check. If the FCR resulted in a figure or gun section lost that would change a unit’s future BMP — such as now being a depleted one stand infantry or an artillery battery with one lost section – that does not take effect until the unit’s next morale check.
- If a unit was within one inch (100 yards) of a unit that was eliminated from the game, a leader that was killed, or if it was passed by a routed unit that came within one inch (100 yards) of the unit in question, it must check morale.
- If a unit is defending against a charge and if all the defensive reaction fires failed to stop the charging unit, then the defending unit will have to take a pre-impact morale check immediately after the charging unit has moved within one inch (100 yards) and immediately before the Charge Impact Resolution.
Effects of Morale Checks and Rally Attempts
Anytime a unit checks morale or attempts to rally there is the chance that its morale level can improve, degrade, or stay the same. There is also the outside chance that individual stragglers will rally to the cause or other less courageous individuals will desert the colors. All morale checks and rally attempts are done with 2D6. For any morale check or rally attempt, if a unit rolls exactly its current MMP, then its morale level does not change. If, however, the gamer rolled higher than the unit’s current MMP, the unit’s morale level will improve – how much, however, would depend on how high was the roll. Likewise, should the gamer roll lower than the unit’s MMP, its morale will degrade and how bad will depend on how low was the roll.
The immediate effects of a morale check or rally attempt are as follows:
- If the unit rolls a natural unmodified “2”, the unit immediately losses an additional figure or gun section and routs a distance equal to the roll of 1D6, 2D6 or 3D6 per the appropriate Movement Table on the Reference Chart. If this was an artillery battery and the die roll was an even number, then the guns are abandoned and the unit is removed – if odd, the battery limbers up and routs. If the unit did roll a “2” and lost another figure, it does not have to take another morale check for figure lost.
- If the unit rolls 5 or more less than its MMP, it drops two morale levels. So, a good order unit would now be shaken and a disordered unit is now routed – if routed, roll for the distance the unit flees as above. Any friendly units with one inch (100 yards) or are passed by the newly routed unit must check morale.
For example, if a good order unit had an MMP of 8 and rolled a “4” for a morale check or rally attempt, its morale would drop two levels to shaken. - If the unit rolls 1 to 4 less than its MMP, it drops one morale level.
- If the unit rolls exactly its MMP, there is no change to its morale level. Its morale stays the same, whether this was a morale check or a rally attempt.
- If the unit rolls 1 to 4 points higher than its MMP, its morale improves one level.
- If the unit rolls 5 or higher than its MMP, its morale improves two levels. For example, if a shaken unit with an MMP of 5 rolled a “10” for a rally attempt, its morale would raise two levels to good order.
- If the unit rolls a natural “12”, it goes immediately to “good order” and recovers a lost figure or gun section.
Morale Check Examples – Getting Better or Worse
For example, if a veteran regiment in good order, with a BMP=3, received fire and took one hit (H1), it would have to check morale with a +1 to its MMP, so it would have to roll a “4” to not get any worse.
If, however, that same veteran regiment, after taking one hit, was already shaken with a +2 to its MMP for an MMP of “6”, it would have to roll a “6” to avoid any further morale degradation. If, however, it rolled a “5” then the unit would drop one level and would rout since it was already shaken. And if it was very unlucky and rolled a natural “2” it would rout and lose an additional figure.
Or perhaps at this moment of crises the regimental commander was very encouraging and for this morale check the unit rolled a “9” with the result that its spirits rose and now it would have rallied from shaken to disorder. And, if that regimental commander was very inspiring and the unit rolled an “11”, then the regiment would have courageously responded to the crises and reformed into good order. Finally, if the commander was positively charismatic and the unit rolled a natural “12” not only would the unit have reformed into good order, sufficient stragglers and shirkers would have returned to the colors that the unit would reclaim its lost figure.
For example, if a trained artillery battery in good order (BMP = 4) just lost a gun section from an H1 FCR from enemy artillery fire, its MMP would be increased by +1 for the H1 FCR for a new MMP of “5” for this specific morale check. So, this artillery battery would have to roll a “5” to pass this morale check and not get any worse. If the battery rolled a “3” or “4” it would go shaken since it rolled 1 to 4 less than its MMP. But, if it rolled a 2 it would immediately rout and would lose another gun section and if a “2” was rolled — since it was “even”, the gunners have totally panicked and ran off abandoning all the guns – and obviously, this battery is removed from the game. On the other hand, if the battery rolled a natural “12” they not only would have passed the check, but they would have also recovered the lost gun section, since the repairs were obviously minor. In any case, since a section was lost from fire due to the H1 FCR result, the BMP for this battery would be increased by “+2” to a “6” for any future morale checks or rally attempts.